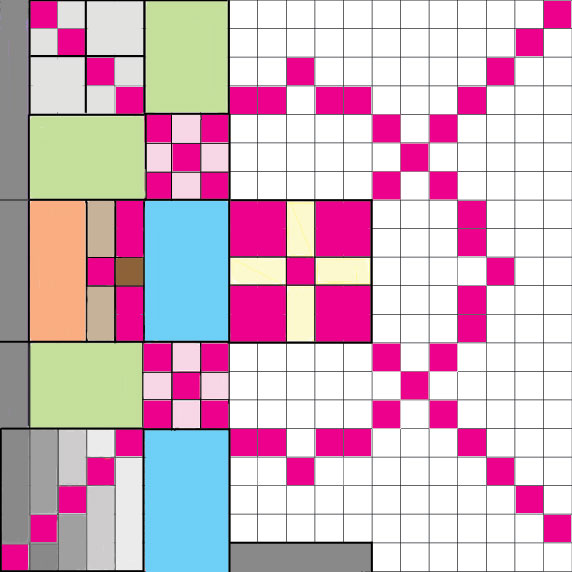
The Burgoyne Surrounded version below is from Yvonne Khin's
The Collector's Dictionary of Quilt Names and Patterns. Here's a whole-quilt mockup to right. It's in three colors, but what you will make using this diagram is in just TWO colors.
Unlike the rest of the diagrams on this site, our Burgoyne Surrounded graphic is not a pattern, but simply a road map for assembling a TWO-COLOR block.
The block is asymmetrical.
It has four squares in each corner, except for one block corner where there are five.
That's why the block contruction is so involved.
Each block is 20 squares wide and tall. That means that a 20" block has pieces as small as ONE INCH each. Alternatively, you can make it 40 inches wide and tall, with the squares 2" each, etc.
Any bigger than that and a single block will cover the entire width of a queen bed.
We've minimized the number of small squares, which may make the block less perfect to
traditionalists, but you're always welcome to use little squares throughout.
In
In the graphic, every piece NOT in bright pink is in the BACKGROUND COLOR.
You'll need the following pieces for each block:
Green: 6 pieces, plus seam allowances of 1/4" per side
Blue: 6 pieces, plus seam allowances of 1/4" per side
Pink & yellow (center): One assembly per block
Light gray (upper left corner of the diagram):
2 complete assemblies of two plain blocks and 2 four-patch blocks.
Striped gray (lower left corner):
2 complete assemblies. Include seam allowances for each rectangle.
For most of the stripes, that will be an additional inch in length and half-inch in width
Remember, everything but the dark pink pieces are in your background fabric.
Darkest gray side stripe (on left): 1 per block, plus seam allowances Assemble the panels:
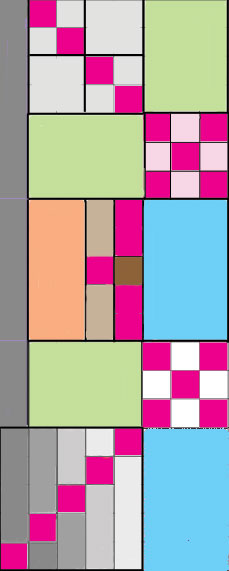
We are now going to assemble the left side of the block in the diagram, a total of 8 squares wide and 20 squares long.
1.
Assemble TWO of the 7-square by 7 square blocks in the upper left corner (gray, green, and light pink sections.) One assembly will go in the upper left corner and the other, turned 90 degrees clockwise, will go in the upper right corner.
Attach the dark gray strip to ONE of them.
2. Assemble the center left rectangle -- the orange, light and dark brown, and blue pieces. Add a dark gray stripe to ONE of them.
3. Attach the square from step #1 to the
rectangle from step #2.
4. Join the third green rectangle and the second nine-patch (pink)
together. Add the dark gray stripe piece (which is in your background color, remember) to ONE of the assemblies from step #3.
5. Assemble the lower-left corner square and attach it to the blue rectangle next to it. Attach that assembly to the larger assembly that you finished in Step #4.
Good work! Now for your next magical trick, you're going to...
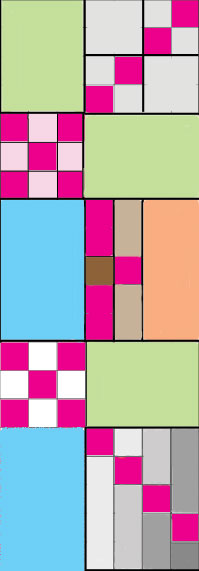
6. Assemble the right side the same way you did the left, but make it a MIRROR IMAGE of the left side. Scroll down to see how the right panel should look.
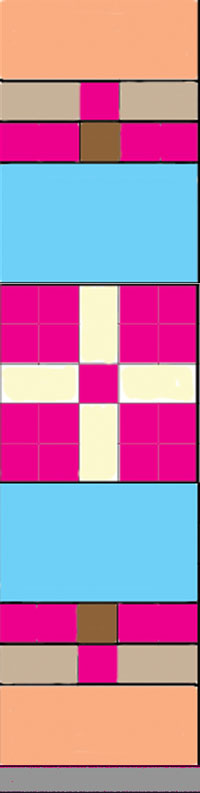
7. Remember that you have four assemblies of the orange-brown-blue rectangle that is the center part of each panel? Good. You've already used two. Take the other two and attach them to the top and bottom of the center block.
8. Add the dark gray stripe to the center-panel bottom.
9. Sew the left panel to the center panel and the right panel to the other side of the center panel.
10. Congrats! Now make more blocks.
If you used 1" squares, make 11 more blocks to cover a queen bed top, 3 blocks across and 4 blocks high, 60" x 80". Add borders to reach the width and length you want.
If you used 2" squares, that's three more blocks; you'll have a 4-block quilt top 80" square.
If you used 3" squares, you've finished a 60" square. You'll add wide borders to reach the quilt size you want.
 Burgoyne Surrounded diagram
***
Burgoyne Surrounded diagram
***
 The Burgoyne Surrounded version below is from Yvonne Khin's
The Collector's Dictionary of Quilt Names and Patterns. Here's a whole-quilt mockup to right. It's in three colors, but what you will make using this diagram is in just TWO colors.
The Burgoyne Surrounded version below is from Yvonne Khin's
The Collector's Dictionary of Quilt Names and Patterns. Here's a whole-quilt mockup to right. It's in three colors, but what you will make using this diagram is in just TWO colors.